Tutorial
Get started using MonkeyCI by following this tutorial. It explains:
- Writing the first build script
- Running it locally using the CLI
- Registering a new account
- Setting up your first repo
- Automatically build it online
- Make your script more powerful by including plugins
Getting Started
You can use MonkeyCI without any limitations on your own system if you install the CLI. You can do this by running this script:
$ wget https://monkeyci-artifacts.s3.fr-par.scw.cloud/install-cli.sh -O - | bash
After that, you can run the MonkeyCI cli by simply running monkeyci. See the cli page for more details. Now, since there is nothing to run it on, you first need to write an initial script.
Setting up the Project
Let's assume we're building a Java application using Maven. We'll use the archetype plugin to generate the initial project files:
$ mvn archetype:generate -B \
  -DarchetypeArtifactId=maven-archetype-quickstart \
  -DgroupId=com.monkeyci \
  -DartifactId=tutorial \
  -Dversion=0.1-SNAPSHOT \
  -Dpackage=com.monkeyci.tutorial
This will create a tutorial directory with a basic Java project. We're assuming you know how Maven works, so you can tailor this for your own needs. You can check if it builds by running Maven manually:
$ cd tutorial
[tutorial] $ mvn verify
Eventually you should see something like this:

The Initial Script
MonkeyCI assumes your build scripts are in the .monkeyci/ directory, although you can override this. In this tutorial, we'll use the standard settings though. So let's assume we're putting this tutorial in the tutorial directory. Create the directory, and also the .monkeyci subdirectory:
[tutorial] $ mkdir .monkeyci
We will add a single job to the script, that initially just prints a message. Now put this into the ./.monkeyci/build.yaml file:
- id: first-job
  image: docker.io/alpine:latest
  script:
    - 'echo "This my first MonkeyCI script!"'
What this script does it will pull the specified image, start a container, and then run each of the script steps inside that container.
Note that MonkeyCI also supports EDN and JSON, in addition to the powerful Clojure language, but we'll explain the latter later on. Now run the build (make sure you're in the tutorial directory):
[tutorial] $ monkeyci build run
In the background, this will start a Java process that loads and runs the build script jobs. In this case, there is only one container job, so it will also start a container using podman.
The result should look something like this:

It works! The output is not displayed, but you can look it up in the output logs, as printed by the CLI. Ok, now let's make it actually do something!
Expanding the Script
Of course, we'll want to compile our code and run any unit tests. Basically, we'll need to run the previously mentioned mvn verify command. For portability purposes, we'll best do this in a container. Let's replace the initial script by this new one, so edit the .monkeyci/build.yaml file with this result:
- id: mvn-verify
  image: docker.io/maven:latest
  script:
    - mvn verify
This should result in a similar successful output as with the initial script. Note that MonkeyCI does not run the build in the current directory. Instead, it copies the source files to a temporary directory and runs the build and jobs from there. This is to avoid jobs contaminating each other. If you want to transfer files from one job to the next, you'll need artifacts and dependencies.
Multiple Jobs
So far we've only run a single job. But of course it's possible to have multiple jobs as well. By default, MonkeyCI will run these jobs simultaneously. If you want to run them in a particular order, you'll need to make them dependent of each other. Suppose we want to run the tests separately from the packaging. So one job is responsible for testing, the other one for creating the jar file. In order to achieve this, edit the build.yaml like this:
- id: test
  image: docker.io/maven:latest
  script:
    - mvn test

- id: package
  image: docker.io/maven:latest
  script:
    - mvn package -Dmaven.test.skip
What happens when we run this? Since the jobs are not dependent on each other, both are run simultaneously. So MonkeyCI starts two containers at once, one for the tests, and another one for packaging.
But this may not be the best approach. What if a test fails? Then we'll have executed the packaging step needlessly. We can simulate this situation by replacing the default test with a failing one. Edit src/test/java/com/monkeyci/tutorial/AppTest.java into this:
    /**
     * Rigourous Test :-)
     */
    public void testApp()
    {
        // Intentionally make this test fail
        assertTrue( false );
    }
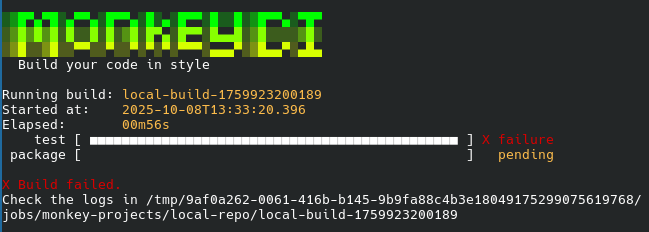
The result will look like this:

We don't want to execute the package step if tests fail, since in a larger codebase, both of these may take a long time. In order to solve this, we can make the package job dependent on the test job. This is done simply by adding a dependencies property:
- id: test
  image: docker.io/maven:latest
  script:
    - mvn test

- id: package
  image: docker.io/maven:latest
  script:
    - mvn package -Dmaven.test.skip
  # Only run packaging if tests succeed
  dependencies: [test]
When re-running the build, the result looks like this:

Now you see the package job has been skipped, since the job it was dependent on, test, has failed. Should you want to, you can inspect the job outputs in the directory as printed in the last output line. In case of problems, this directory may also contain other useful information for debugging.
Artifacts
Now, fix the "rigourous test" we broke earlier so the test phase succeeds again. Suppose we now want to create a container image from our package. This requires an additional job. But this time, the job needs information from the package job. Enter artifacts, which allow you to pass files from one job to another, as well as publishing them to the outside world.
In order to publish an artifact from a specific job, you need to specify it using the save-artifacts property. Similarly, exposing a previously saved artifact to a job is done with the restore-artifacts key.
In this phase, we will do the following:
- Configure Maven to set the main class in the packaged jar file.
- Create a
Dockerfilefor the container image. - Add a build job that creates the container image.
Configure the Main Class
This is explained in the Maven documentation, but suffice to know that you need to add this to your pom.xml:
  <build>
    <plugins>
      <plugin>
        <groupId>org.apache.maven.plugins</groupId>
        <artifactId>maven-shade-plugin</artifactId>
        <version>3.6.1</version>
        <executions>
          <execution>
            <phase>package</phase>
            <goals>
              <goal>shade</goal>
            </goals>
            <configuration>
              <transformers>
                <transformer implementation="org.apache.maven.plugins.shade.resource.ManifestResourceTransformer">
                  <mainClass>com.monkeyci.tutorial.App</mainClass>
                </transformer>
              </transformers>
            </configuration>
          </execution>
        </executions>
      </plugin>
    </plugins>
  </build>
Now, if you run mvn install, it will create a package file in target/tutorial-0.1-SNAPSHOT.jar which, when executed will print a message:
$ java -jar target/tutorial-0.1-SNAPSHOT.jar
Hello World!
The Dockerfile
We will now create a Dockerfile that will use the packaged jar file and execute it in a container. The file could look like this:
# Use the Eclipse Temurin OpenJDK implementation
FROM docker.io/eclipse-temurin:latest

WORKDIR /opt/app

ADD target/tutorial-0.1-SNAPSHOT.jar /opt/app

ENTRYPOINT ["java", "-jar", "tutorial-0.1-SNAPSHOT.jar"]
Save this in the Dockerfile in your project root. You can verify that it works by running these commands (we're using Podman but you can also use Docker):
$ mvn install
$ podman build -t tutorial .
$ podman run -it tutorial
Hello World!
Now, let's put all this in the build script.
Updating the Build Script
We'll have to add a job that creates the image, and make sure it gets access to the previously created executable jar file. The result looks like this:
- id: test
  image: docker.io/maven:latest
  script:
    - mvn test

- id: package
  image: docker.io/maven:latest
  script:
    - mvn package -Dmaven.test.skip
  dependencies: [test]
  save-artifacts:
    - id: package-jar
      path: 'target/'

- id: image
  image: docker.io/monkeyci/kaniko:1.23.2
  script:
    - /kaniko/executor --destination docker.io/monkeyci/tutorial:latest --dockerfile Dockerfile --context dir://. --no-push
  dependencies: [package]
  restore-artifacts:
    - id: package-jar
      path: 'target/'
The last part is a bit complicated. This is because due to the nature of container images and permissions, we can't just build a container image inside another container. It's theoretically possible, but it requires a lot of permissions and settings tweaking. Instead, we're using Kaniko. This is a tool that allows building containers from within other containers without the permissions hassle. Unfortunately it's being discontinued, so we're in the process of looking for an alternative.
But in this tutorial we'll still use it. MonkeyCI has defined it's own version of Kaniko, because the original one does not include a shell, and as such does not allow executing multiple script steps, and using our own image solves that issue. For the sake of this example, we also disable pushing the container to Docker hub using --no-push, because that would require permissions, which is beyond the scope of this tutorial. See parameters for more on this.
Running It Online
Now that we have a fully working build that results in a container image, we want to have it run automatically each time we push a change to the upstream repository. This is useful for collaboration and automation purposes. In order to do this, we'll need to register on the MonkeyCI website and create a new user. Currently, we only support Github and BitBucket accounts, but more will be added in the future.
This does not mean other platforms are completely unsupported. For instance, Codeberg webhooks are compatible with Github, so you can also use this provider with MonkeyCI. See supported platforms for more details.
As soon as you have logged in (which is completely free, by the way), you are invited to create a new organization. Each account is entitled to one free organization, that can then be used to add new repositories. Suppose that for this tutorial, we'll be using Codeberg, which is free and Europe-based, so we're sure our very sensitive information is privacy-protected. Create a new repository, call it tutorial, and save it. Then initialize git in your local directory, and configure the upstream, like so:
$ git init --initial-branch=main
$ git remote add origin https://codeberg.org/your-username/tutorial.git
$ git add .
$ git commit -m "Initial commit"
$ git push -u origin main
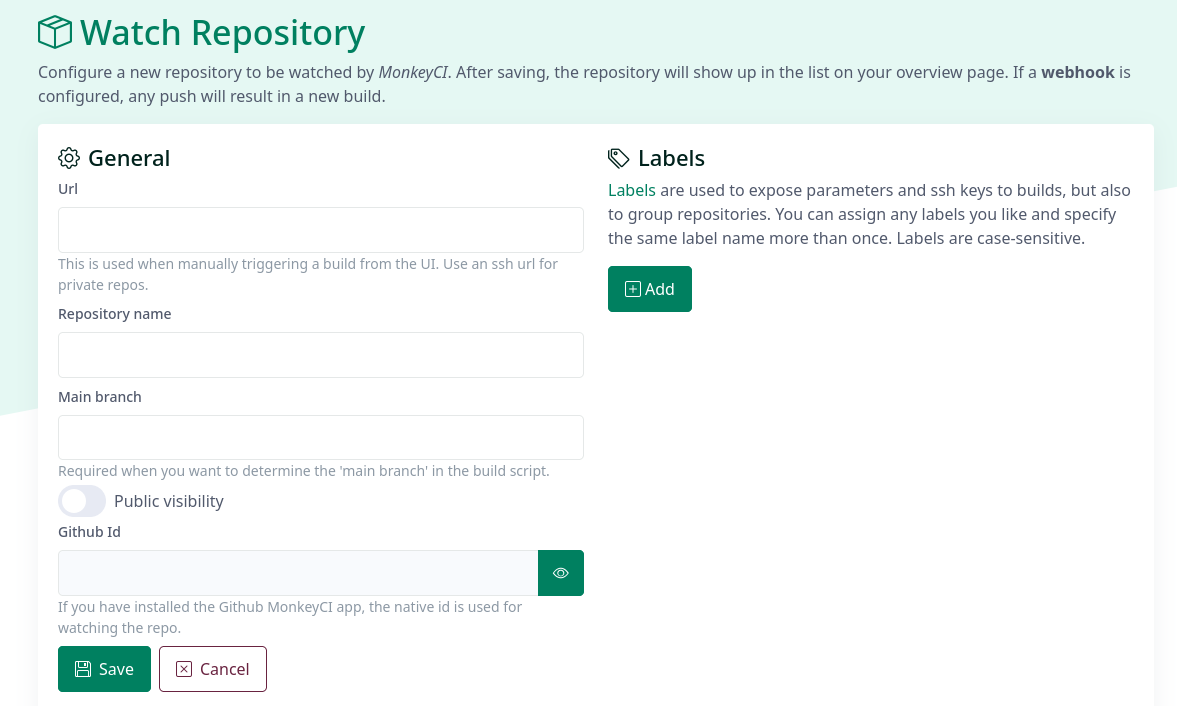
The above initializes git, does a first commit with the files we've just written, and pushes it upstream. Now, we'll need to tell MonkeyCI that it needs to watch this repository for any changes. First, add the repository in MonkeyCI. This is as simple as clicking the Add Repository button. You will need to enter a form that looks like this:

Enter the git url in the url field, give it a meaningful name and put main as the main branch. You can ignore the other fields. After clicking the "Save" button, you will return to the repository overview screen, where you should see the repository listed.
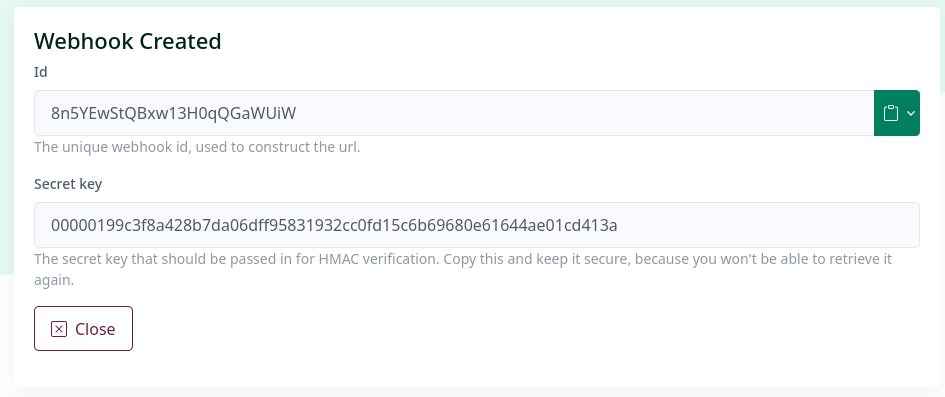
You can manually trigger a build, to see that it works online as well, by clicking the "Trigger Build" button. This is also free, because you receive 1.000 free credits per month. But for the builds to be run automatically, we have to configure a webhook. A webhook is a way for Codeberg to let MonkeyCI know that a push has occurred. Click the "Details" button. You will see the builds for this repository, which may still be empty if you have not triggered a manual build. Go on to the "Settings" page, and then continue to "Webhooks". Click the "Add" button, which will create a new webhook. The result looks something like this:

Be sure to copy the secret key and keep it safe, because when you close this form, there is no way to retrieve it! By clicking the clipboard button to the right of the id, you can copy the full webhook url.
Now go to your repository in Codeberg, then click "Settings", then "Webhooks", then "Add webhook". There you can add the webhook information. Select "Forgejo" as the webhook type, which will create a Github-compatible payload, which can be read by MonkeyCI. Fill in the url and the secret from the MonkeyCI form, and leave the other properties untouched. After clicking "Add webhook" at the bottom, the new webhook will be activated.
From now on, every time you push a change to the Codeberg repository, it will notify MonkeyCI through the webhook, which in turn will start a new build.
Using Plugins
So far, you have written a build script that runs the unit tests, builds a package jar and deploys that in a container image. Not bad! This is however nothing new, other tools can do that too. But one of the core features of MonkeyCI is that you can do all this in a much more succinct way. This can be done by switching to Clojure as the scripting language (instead of, or in addition to yaml) and by applying plugins to increase reuse.
Clojure is just a programming language, albeit one with a tiny syntax. And plugins are libraries that hold reusable job definitions. Anyone can build their own plugins and we have also provided several of our own.
Using several of these plugins, the above script can be rewritten as:
(ns build
  (:require [monkey.ci.api :as m]
            [monkey.ci.plugin
             [mvn :as mvn]
	     [kaniko :as kaniko]]))

;; Job definitions

(def mvn-test
  (mvn/mvn {:job-id "test"
            :cmd "test"}))

(def package-art (m/artifact "package-jar" "target/"))

(def mvn-package
  (-> (mvn/mvn {:job-id "package"
                :goals ["package"]
		:opts ["-Dmaven.test.skip"]})
      (m/depends-on "test")
      (m/save-artifacts [package-art])))

(def img
  (kaniko/image-job
   {:job-id "image"
    :target-img "docker.io/monkeyci/tutorial:latest"
    :arch :amd
    :container-opts {:dependencies ["package"]
                     :restore-artifacts [package-art]}}))

;; List of jobs passed to MonkeyCI
[mvn-test
 mvn-package
 img]
We'll also have to declare our dependencies in a deps.edn file, to indicate the various plugins and their versions:
{:deps {com.monkeyci/plugin-mvn {:mvn/version "0.1.0"}
        com.monkeyci/plugin-kaniko {:mvn/version "0.2.1"}}}
This looks a lot different compared to the original yaml script. Note that we could also combine it with yaml. We could have left the test and package jobs in the build.yaml, and just redefined the image using the plugin. But this example just scratches the surface of what is possible with the Clojure format. We haven't even talked about conditional jobs or script tests! But this is beyond the scope of this tutorial, so we suggest you take a look at the dedicated documentation pages for more on those subjects.
Conclusion
In this tutorial, you have learned how to set up your first build script, configured MonkeyCI to automatically run it on each change, use dependencies and artifacts, and we've also hinted at the awesome power that is available using the Clojure format. We hope this has been enlightening to you and that it puts you on track to take full advantage of the possibilities of MonkeyCI!